openVAS Full Guide Walkthrough
Title: OpenVAS
Estimated Completion Time: 1-2 hours Skills Required: Basic Linux knowledge, familiarity with web interfaces, and introductory networking concepts.
- Objectives:
- Install and configure OpenVAS on a Linux environment (typically Kali Linux).
- Perform vulnerability scans on target machines.
Introduction
What OpenVAS Is :
A vulnerability scanning application for endpoints and web applications.Part of the Greenbone Vulnerability Management (GVM) solution.
Purpose and Use Cases:
Helps organizations identify security gaps on production or development systems. Supports mitigation efforts by detecting common vulnerabilities that may otherwise be overlooked.
the GVM/OpenVAS Architecture OpenVAS is one component service within the broader Greenbone Vulnerability Management (GVM) framework. GVM is composed of multiple services that together deliver vulnerability scanning and management capabilities. These services can be grouped into three main sections.
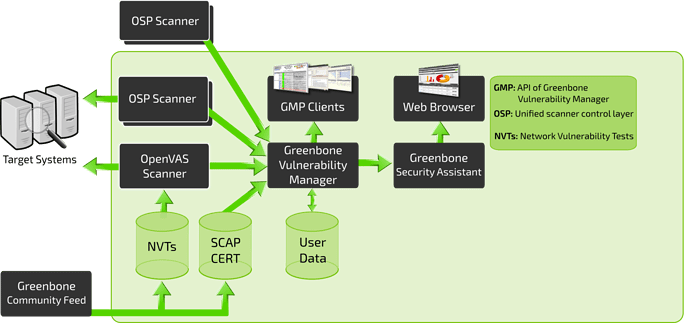
we can break it down into three distinct sections: Front-End, Back-End, and Vulnerability/Information feed.
Vulnerability / Information Feed
- Provides all vulnerability tests and data used for scanning.
- Primarily sourced from the Greenbone Community Feed.
- Includes:
- NVTs (Network Vulnerability Tests)
- SCAP and CERT data
- Optional user-provided data to replace or supplement official feeds.
- Includes:
- Back-End
- The core scanning and processing layer of GVM.
- OpenVAS performs the actual vulnerability scanning.
- Managed by the Greenbone Vulnerability Manager (GVM), which acts as the intermediary between scanners and user interfaces.
- handles
- Processing NVTs
- Managing targets
- Coordinating scanners via OSP (Open Scanner Protocol)
- handles
- Front-End
- The user-facing interface for interacting with the GVM system.
- Built on the Greenbone Security Assistant (GSA).
- Provides web-based tools for analysts to configure and manage scans.
Install and configure OpenVAS on a Linux environment.
This guide shows the fastest and most reliable way to install and run Greenbone Vulnerability Management (GVM) – the current official name of OpenVAS – on Kali Linux (rolling release as of 2025).
Kali already includes GVM in its repositories and often ships it pre-installed but not configured. Just run the setup!
Method 1: Recommended – Use Kali’s Pre-installed GVM (5–30 minutes)
1
2
3
4
5
6
7
8
# 1. Update system
sudo apt update && sudo apt full-upgrade -y

# 2. Install/repair GVM packages
sudo apt install gvm -y

# 3. Run the official setup (creates admin user, downloads feeds, configures services)
sudo gvm-setup
The first run downloads ~2–4 GB of vulnerability feeds. Be patient (10–30 minutes depending on internet speed). At the end you will see:
1
User created with password 'xxxx-xxxx-xxxx-xxxx'.
COPY AND SAVE THIS PASSWORD!
1
2
# 4. Verify everything is correct
sudo gvm-check-setup
Should end with: Your GVM installation is OK.
1
2
# 5. Start GVM and open the web interface
sudo gvm-start
Web interface: https://127.0.0.1:9392
Default login: admin / (the password shown in step 3)
Accept the self-signed certificate.
First Login Tips
Change the admin password immediately (Configuration → Users).
Update feeds (Administration → Feed Status → click “Update”).
Create your first scan target and launch a “Full and Fast” scan.
Performing Your First Vulnerability Scan
Now that GVM is running and you’re logged in as admin, let’s perform a real scan!
Step 1: Create a Target
A Target defines what you want to scan (single IP, range, hostname, etc.).
- In the top menu, go to Configuration → Targets
- Click the magic wand/star icon (New Target) in the top-left
Fill in the form:
- Name:
TryHackMe Lab→ any descriptive name you like - Hosts: Enter the IP(s) or hostname(s) to scan
Examples (use only what you have permission for):- Single machine:
10.10.87.142 - Range:
192.168.1.0/24 - Multiple IPs:
10.10.50.100, 10.10.50.101 - Public test host:
scanme.nmap.org(explicitly allows scanning)
- Single machine:
- Leave all other settings default for now
- Name:
- Click Save
Critical Reminder: Never scan systems or networks you do not own or have written permission to test. Unauthorized scanning is illegal in most countries.
Step 2: Create a Scan Task
A Task tells GVM how and what to scan.
- Go to Scans → Tasks
- Click the magic wand/star icon (New Task)
Configure the following:
Field Recommended Value Why? Name Full Scan - Lab NetworkEasy to identify later Target Select the target you just created Links the task to your IPs Scan Config Full and fast Best balance of speed and coverage (uses smart optimizations) Scanner OpenVAS Default Leave as is — this is the actual scanning engine Scan Order Sequential (default) Fine for most labs - Click Create
Step 3: Launch the Scan
- On the Tasks page, find your new task
- Click the green Play button → Start
- You’ll be taken to the live status page
Real-time progress appears in:
- Scans → Dashboard (overall view)
- Scans → Tasks → click your task name (detailed progress bar)
A small lab machine usually finishes in 5–20 minutes.
Step 4: Understanding the Different Scan Configurations
| Config Name | Description | When to Use |
|---|---|---|
| Full and fast | Fastest complete scan — skips tests that would slow it down unnecessarily | Default choice for 95% of scans |
| Full and fast ultimate | Adds more network-intensive tests | When you need slightly more coverage |
| Full and very deep | Exhaustive — no optimizations, scans every possible port & service | Very slow, only for critical assets |
| Full and very deep ultimate | Maximum aggressiveness — can trigger IDS/IPS | Rarely needed outside compliance audits |
Recommendation: Always start with Full and fast.
Step 5: Analyzing the Results
When the progress bar hits 100% (green):
- Go to Scans → Results
- You’ll see a list of all discovered vulnerabilities, sorted by severity:
- High (red) → Critical issues (often remotely exploitable)
- Medium (orange)
- Low (yellow)
- Log (blue) → informational only
- Click any vulnerability to see:
- CVE ID & CVSS score
- Affected software/version
- Detailed description
- Solution / remediation steps
- References (Exploit-DB, Metasploit modules, etc.)
Pro tip: Right-click a result → Override → mark as False Positive if you know it’s not applicable.
Step 6: Generate Professional Reports
- Go to Scans → Reports
- Click the latest report (date/time of your scan)
- In the top-right corner, click the Download arrow
Choose your preferred format:
Format Best For PDF Management, audits, compliance HTML Interactive viewing in browser CSV Import into Excel or ticketing XML Automated processing / SIEM
Common (Legal & Safe) Scan Targets for Practice
| Target | IP / Hostname | Notes |
|---|---|---|
| scanme.nmap.org | scanme.nmap.org | Officially allows Nmap/OpenVAS scanning |
| TryHackMe deployed VMs | Your machine IP | Perfect for labs |
| Metasploitable 2/3 | Your VM IP | Will find 100–500+ vulnerabilities |
| Vulnerable labs (e.g., VulnHub) | Local/virtual IPs | Always stay within your own network |
Top Alternatives to OpenVAS/GVM
| Tool | Type | License | Best For | Key Advantages | Drawbacks vs OpenVAS | Latest Stable Version (Dec 2025) |
|---|---|---|---|---|---|---|
| Nessus Professional | Commercial | Proprietary | Small–medium businesses, consultants | Extremely accurate, beautiful UI, great support | Expensive (~$3k–$10k/year) | Nessus 10.7+ |
| Tenable.io / Tenable.ep | Cloud + On-prem | Proprietary | Enterprises, large-scale environments | Unlimited scanning, asset management, predictive prioritization | Very expensive, vendor lock-in | Continuously updated |
| Qualys VMDR | Cloud | Proprietary | Global enterprises, compliance-heavy orgs | Zero infrastructure, excellent asset tagging | High cost, requires internet | Cloud Platform 2025.x |
| Nexpose / InsightVM (Rapid7) | On-prem + Cloud | Proprietary | Mid-to-large enterprises | Real-risk scoring, Metasploit integration | Pricey, heavier resource usage | InsightVM 6.6+ |
| Burp Suite Pro (Scanner) | Web-focused | Proprietary | Web application security testing | Best-in-class web vulnerability scanner | Not a network scanner | Burp Suite 2025.11+ |
| Nuclei | Open Source | MIT | Fast, modern, CTF & red-team scanning | YAML-based templates, blazing fast, community-driven | Requires manual target & template management | v3.2.9+ |
| RustScan + Nuclei combo | Open Source | GPL/MIT | Speed demons & bug bounty hunters | Finds open ports in <3 sec + custom scans | Less polished reporting | RustScan 2.3 + Nuclei 3.x |
| ZAP (OWASP Zed Attack Proxy) | Open Source | Apache 2.0 | Web app scanning (free alternative to Burp) | Active & passive scanning, CI/CD integration | Only web, not network | ZAP 2.15+ |
| Faraday | Open Source + Paid | GPL + Commercial | Collaborative pentest & vuln management | Integrates results from OpenVAS, Nessus, Nmap, etc. | More of a platform than a scanner | Faraday v5.x |
| Wapiti | Open Source | GPLv2 | Lightweight black-box web scanner | Simple CLI, good for quick web checks | Fewer features than Burp/ZAP | Wapiti 3.1+ |
| Vuls | Open Source | GPL | Agentless Linux/server vulnerability scanning | No agent needed, great for Linux fleets | Focused on OS/packages only | Vuls v0.25+ |
| Trivy | Open Source | Apache 2.0 | Container, IaC, and OS vulnerability scanning | Extremely fast, perfect for DevSecOps | Not a traditional network scanner | Trivy 0.56+ |
Quick Decision Matrix (What Should You Choose?)
| Your Situation | Recommended Alternative |
|---|---|
| You want free + unlimited scanning | Nuclei or RustScan + Nuclei |
| You need enterprise features & budget | Tenable.io or Qualys VMDR |
| You already pay for Nessus (common in consulting) | Stick with Nessus Professional |
| You only scan web applications | Burp Suite Pro or OWASP ZAP (free) |
| You love OpenVAS but want something faster/lightweight | Nuclei (modern replacement) |
| You manage Linux servers/containers only | Trivy or Vuls |
| You want a central platform for all tools | Faraday (imports OpenVAS reports too) |
Bottom line in 2025:
OpenVAS/GVM is still one of the best fully free network vulnerability scanners, but Nuclei has become the de-facto open-source successor for speed and modern workflows.
You’re now fully equipped to run professional-grade vulnerability scans with OpenVAS/GVM!
Happy (and responsible) hacking!